sohow


  • 首页

  • 归档

  • 标签

高并发解决方案之NGINX缓存

发表于 2018-02-23

简介

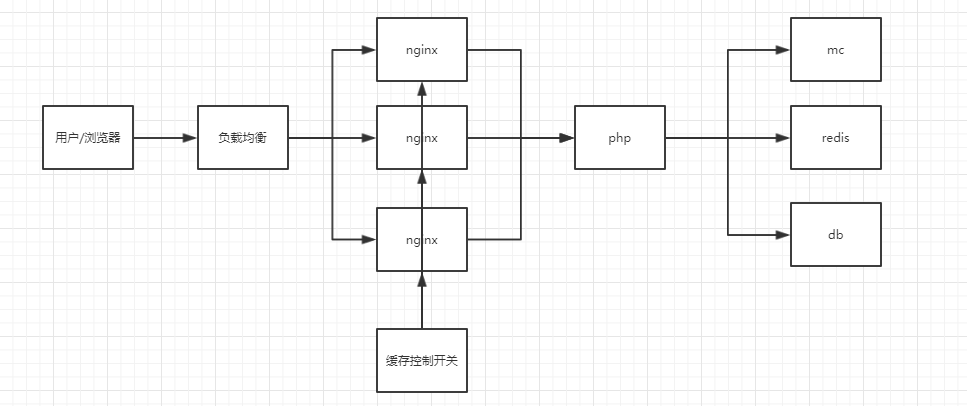
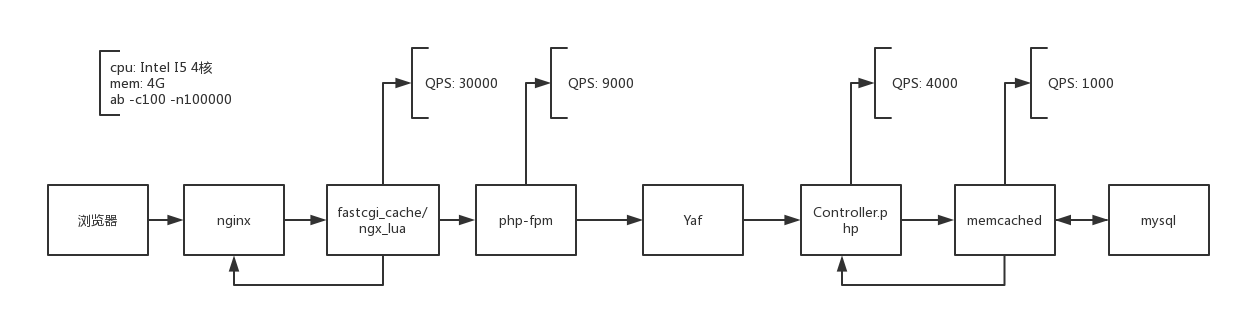
使用ngx_lua模块在Nginx层做缓存,可动态控制缓存开关,可做静态方案或者降级方案,
在公司的一个专题页项目中使用该方案,QPS提高了20倍

架构图

Lua代码文件

header_filter.lua文件

1
ngx.header.NgxCache = ngx.var.is_cache

access.lua文件

1
2
3
4
5
6
7
8
9
10
11
12
13
14
15
16
17
18
19
20
21
22
23
24
25
26
27
28
29
30
31
32
33
34
35
36
37
38
39
40
41
42
43
44
45
46
47
48
49
50
51
52
53
54
55
56
57
58
59
60
61
62
63
64
65
66
67
68
69
70
71
72
73
74
75
76
77
78
79
80
81
82
83
84
85
86
87
88
89
90
91
92
93
94
function get_from_cache(key)
local cache_ngx = ngx.shared.ngx_cache
local value = cache_ngx:get(key)
return value
end
function set_to_cache(key, value, exptime)
if not exptime then
exptime = 0
end
local cache_ngx = ngx.shared.ngx_cache
local succ, err, forcible = cache_ngx:set(key, value, exptime)
return succ
end
function safe_add(key, value, exptime)
if not exptime then
exptime = 0
end
local cache_ngx = ngx.shared.ngx_cache
local succ, err, forcible = cache_ngx:safe_add(key, value, exptime)
return succ
end
function get_from_php(k, kk, flag, exptime)
local options = {}
options["method"] = ngx.var.request_method == "GET" and ngx.HTTP_GET or ngx.HTTP_POST
options["body"] = ngx.var.request_body
if ngx.var.args == nil then
ngx.var.args = "debug=0"
end
local args = ngx.decode_args(ngx.var.args)
args.subrequest = flag
options["args"] = args
local uri = ngx.var.uri
local res = ngx.location.capture("/index.php"..uri, options)
if res.status == 200 then
if flag == "open" then
set_to_cache(k, res.body, exptime)
set_to_cache(kk, res.body, exptime*3)
end
return res.body
else
return res.status
end
end
local open = "open"
local close = "close"
local time = 300
ngx.req.read_body()
local k = ngx.req.get_post_args()["containerid"] or "default"
local ctrlkey = ngx.req.get_uri_args()["ctrlkey"] or ""
if ctrlkey == open or ctrlkey == close then
set_to_cache("ctrlkey", ctrlkey, 0)
end
if k == "default" then
time = 10
end
local uri = string.sub(ngx.var.uri,1,100)
k = ngx.var.request_method .. ngx.var.host .. uri .. k
local content = nil
local sw = close
local kk = k .. "old"
sw = get_from_cache("ctrlkey")
if sw == open then
content = get_from_cache(k)
if content ~= nil then
ngx.var.is_cache = 1
else
local atom = safe_add(k .. sw, 1, 5)
if atom == nil then
content = get_from_cache(kk)
if content == nil then
content = get_from_php(k, kk, sw, time)
ngx.var.is_cache = 4
else
ngx.var.is_cache = 2
end
else
content = get_from_php(k, kk, sw, time)
ngx.var.is_cache = 3
end
end
else
content = get_from_php(k, kk, sw, time)
end
ngx.print(content)

Nginx主要配置

1
2
3
4
5
6
7
8
9
10
11
12
13
14
15
16
17
18
19
20
21
22
23
24
25
26
27
28
29
30
31
32
33
34
35
36
37
lua_code_cache on;
lua_shared_dict ngx_cache 32m;
#...
set $flag 1;
if ($arg_subrequest = "") {
set $flag "1${flag}";
}
if ($arg_containerid ~ "newartificial") {
set $flag "1${flag}";
}
if ($arg_containerid = "") {
set $flag "1${flag}";
}
if ($uri ~ "^/(path.*)$") {
set $flag "1${flag}";
}
if ($flag = "1111") {
rewrite "(.*)" $1 break;
}
#...
location ~ /(.*)\.lua$ {
deny all;
}
location ^~ /path {
default_type text/html;
set $is_cache 0;
header_filter_by_lua_file /XXXXX/lua/header_filter.lua;
access_by_lua_file /XXXXX/lua/access.lua;
}

缓存开关控制脚本

1
2
3
4
5
6
7
8
9
10
11
12
13
14
15
16
17
18
#!/bin/bash
# ./ctrl.sh open 开启缓存
# ./ctrl.sh open 关闭缓存
ips=(10.x.x.x 10.x.x.x 10.x.x.x 10.x.x.x 10.x.x.x 10.x.x.x)
if [ x$1 != x ]; then
state=$1
else
echo "need param open or close"
exit 1
fi
state=$1
for ip in ${ips[@]};
do
curl -v -x "$ip:80" -d "uid=xxx" "http://host/path?ctrlkey=$state"
echo ""
done

redis源码阅读之跳跃表skiplist

发表于 2017-06-15

redis跳跃表插入

  • span表示当前层到下一个节点的对应层的跨度,存储在当前节点
  • rank[i]表示update[i]节点的排名
  • update[i]表示i层的第一个要插入节点的前驱节点
1
2
3
4
5
6
7
8
9
10
11
12
13
14
15
16
17
18
19
20
21
22
23
24
25
26
27
28
29
30
31
32
score: 2 span: 1 1 1 1 @@@@
score: 26 span: 1 1 1 1 1 7 @@@@@@
score: 27 span: 1 1 1 1 6 @@@@@
score: 29 span: 1 3 4 4 @@@@
score: 63 span: 1 @
score: 67 span: 1 @
score: 83 span: 1 1 @@
score: 92 span: 1 1 1 1 @@@@
score: 93 span: 0 0 @@
rank: 2 update: 26
rank: 3 update: 27
rank: 4 update: 29
rank: 4 update: 29
rank: 4 update: 29
rank: 6 update: 67
score: 2 span: 1 1 1 1 @@@@
score: 26 span: 1 1 1 1 1 5 @@@@@@
score: 27 span: 1 1 1 1 4 @@@@@
score: 29 span: 1 3 3 3 @@@@
score: 63 span: 1 @
score: 67 span: 1 @
score: 69 span: 1 1 2 2 3 3 3 3 @@@@@@@@
score: 83 span: 1 1 @@
score: 92 span: 1 1 1 1 @@@@
score: 93 span: 0 0 @@
x->level[i].span = update[i]->level[i].span - (rank[0] - rank[i]);
3 = 7 - (6 - 2)
update[i]->level[i].span = (rank[0] - rank[i]) + 1;
5 = (6 - 2) + 1

跳跃表原理C语言实现

发表于 2017-06-13

跳跃表和传统链表图示

  • 上图是传统链表,下图是跳跃表图示
  • 可以简单理解跳跃表是在传统顺序链表上通过给节点增加额外(随机个数)指针来做索引,
    其思想类似于折半查询的思想,其效率可以媲美红黑树。

跳跃表C语言实现

1
2
3
4
5
6
7
8
9
10
11
12
13
14
15
16
17
18
19
20
21
22
23
24
25
26
27
28
29
30
31
32
33
34
35
36
37
38
39
40
41
42
43
44
45
46
47
48
49
50
51
52
53
54
55
56
57
58
59
60
61
62
63
64
65
66
67
68
69
70
71
72
73
74
75
76
77
78
79
80
81
82
83
84
85
86
87
88
89
90
91
92
93
94
95
96
97
98
99
100
101
102
103
104
105
106
107
108
109
110
111
112
113
114
115
116
117
118
119
120
121
122
123
124
125
126
127
128
129
130
131
132
133
134
135
136
137
138
139
140
141
142
143
144
145
146
147
148
149
150
151
152
153
#include <stdio.h>
#include <malloc.h>
#include <stdlib.h>
#define MAX_L 10
typedef int typekey;
typedef int typevalue;
typedef struct Node
{
typekey key;
typevalue val;
int level;
struct Node * next[1];
} Node;
typedef struct Skiplist
{
int level;
Node * header;
} Skiplist;
int randomLevel()
{
int level=1;
while (rand()%2) {
level++;
}
level= (MAX_L > level) ? level : MAX_L;
return level;
}
Node * create_node(int level)
{
return (Node *)malloc(sizeof(Node) + (level -1)*sizeof(Node*));
}
Skiplist * create_skiplist()
{
int i;
Skiplist *p = (Skiplist *)malloc(sizeof(Skiplist));
p->level = 0;
p->header = create_node(MAX_L);
for (i = 0; i < MAX_L; i++) {
p->header->next[i] = NULL;
}
return p;
}
typevalue search(Skiplist *list, typekey key)
{
Node *q, *p = list->header;
for (int i = list->level - 1; i >= 0 ; --i) {
while ((q = p->next[i]) && q->key < key) {
p = q;
}
if (q && q->key == key) {
return q->val;
}
}
return NULL;
}
void insert(Skiplist * list, typekey key, typevalue val)
{
int level = randomLevel();
Node *pnode = NULL;
list->level = list->level < level ? level : list->level;
Node *q, *p = list->header;
for (int i = list->level - 1; i >= 0 ; --i) {
while ((q = p->next[i]) && q->key < key) {
p = q;
}
;注意可插入相同key的节点
if (i <= level -1) {
if (pnode == NULL) {
pnode = create_node(level);
pnode->key = key;
pnode->val = val;
pnode->level = level;
}
p->next[i] = pnode;
pnode->next[i] = q;
}
}
}
void delete_node(Skiplist *list, typekey key)
{
Node *q, *p = list->header;
Node *pnode = NULL;
;若有相同key一次只删除一个
for (int i = list->level - 1; i >= 0 ; --i) {
while ((q = p->next[i]) && q->key < key) {
p = q;
}
if (q == NULL && p == list->header) {
list->level--;
}
if (q && q->key == key) {
pnode = q;
p->next[i] = q->next[i];
}
}
if (pnode) {
free(pnode);
}
}
void delete_list(Skiplist *list)
{
Node *p = list->header;
while ((p = p->next[0])) {
free(p);
}
free(list->header);
free(list);
}
int main()
{
Skiplist *list = create_skiplist();
int i;
int key;
for (i = 0; i < 100; i++) {
key = rand() % 100 + 1;
insert(list, key, key);
printf("%d ", key);
}
printf("\n");
typevalue val;
char *s;
Node *p = list->header;
while ((p = p->next[0])) {
val = search(list, p->key);
s = val == p->val ? "OK" : "FAILED";
printf("search %s 0x%d val: %d level: %d", s, (int) p, p->val, p->level);
printf(" (");
for (int j = 0; j < p->level; ++j) {
printf("0x%d ", (int) (p->next[j]));
}
printf(")\n");
}
delete_list(list);
return 0;
}

检查内存溢出

1
2
gcc -Wall main.c -g -o test
valgrind --tool=memcheck --leak-check=full ./test

redis源码阅读之字典dict

发表于 2017-06-06

数据结构

1
2
3
4
5
6
7
8
9
10
11
12
13
14
15
16
17
18
19
20
21
22
23
24
25
26
27
28
29
30
31
32
33
34
35
36
37
38
39
40
41
42
43
44
45
46
47
48
49
typedef struct dictEntry {
void *key;
union {
void *val;
uint64_t u64;
int64_t s64;
double d;
} v;
struct dictEntry *next;
} dictEntry;
typedef struct dictType {
uint64_t (*hashFunction)(const void *key);
void *(*keyDup)(void *privdata, const void *key);
void *(*valDup)(void *privdata, const void *obj);
int (*keyCompare)(void *privdata, const void *key1, const void *key2);
void (*keyDestructor)(void *privdata, void *key);
void (*valDestructor)(void *privdata, void *obj);
} dictType;
/* This is our hash table structure. Every dictionary has two of this as we
* implement incremental rehashing, for the old to the new table. */
typedef struct dictht {
dictEntry **table;
unsigned long size;
unsigned long sizemask;
unsigned long used;
} dictht;
typedef struct dict {
dictType *type;
void *privdata;
dictht ht[2];
long rehashidx; /* rehashing not in progress if rehashidx == -1 */
unsigned long iterators; /* number of iterators currently running */
} dict;
/* If safe is set to 1 this is a safe iterator, that means, you can call
* dictAdd, dictFind, and other functions against the dictionary even while
* iterating. Otherwise it is a non safe iterator, and only dictNext()
* should be called while iterating. */
typedef struct dictIterator {
dict *d;
long index;
int table, safe;
dictEntry *entry, *nextEntry;
/* unsafe iterator fingerprint for misuse detection. */
long long fingerprint;
} dictIterator;

hash函数

1
2
3
4
5
/* The default hashing function uses SipHash implementation
* in siphash.c. */
uint64_t siphash(const uint8_t *in, const size_t inlen, const uint8_t *k);
uint64_t siphash_nocase(const uint8_t *in, const size_t inlen, const uint8_t *k);

解决hash冲突

  • 拉链法解决冲突

解决拉链法解决冲突的弊端

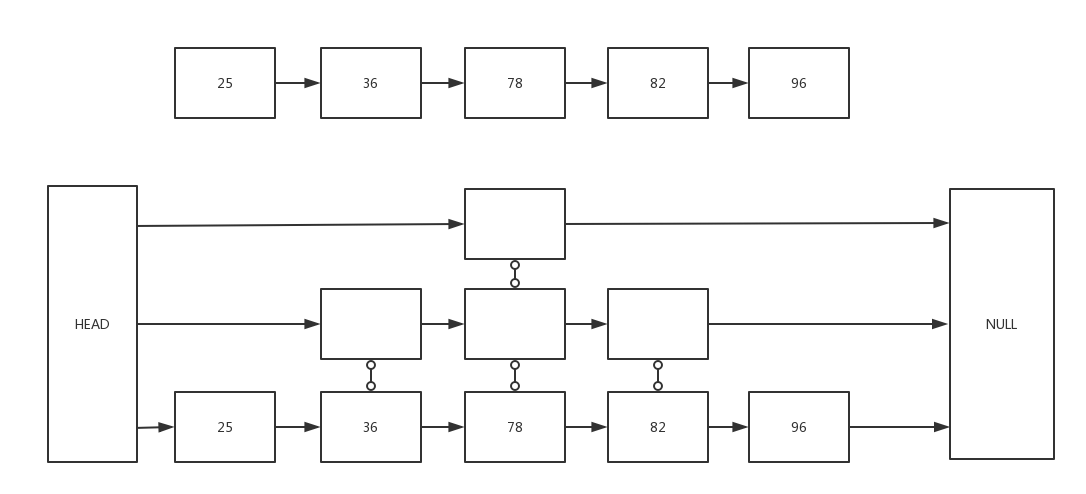
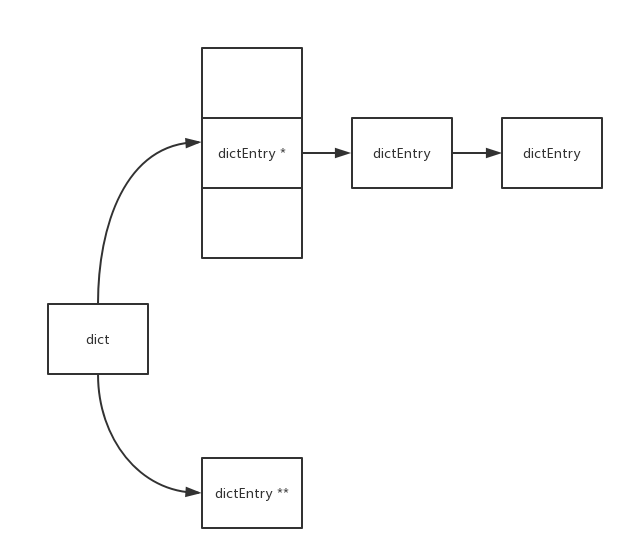
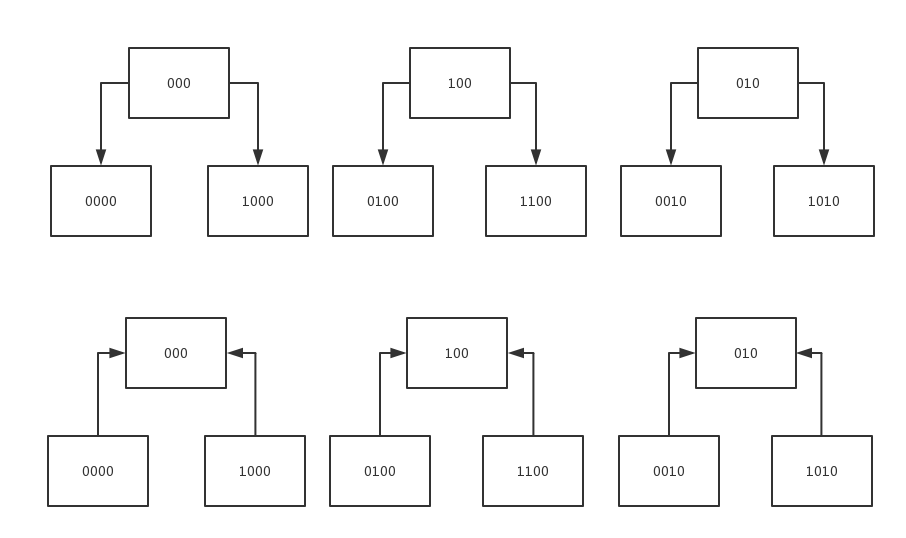
redis使用的是渐进式重散列(incremental rehashing)

  • 重散列
    创建一个更大的hash表,把原来旧的数据一次性全部重新hash到新的表上。
  • 渐进式重散列
    创建一个更大的hash表,把原来旧的数据分步(如get或者set操作时,每次都只重新hash1个)重新hash到新的表上。
    如上图dict中有两个hash tabe, 其中ht[1]就是在重散列时用到的。

渐进式重散列的时机

  • get
  • set
  • delete
  • …

反向递增二进制扫描器(dictScan)

  • 正常的游标递增是从1,2,3,4,5 … 自然数加1递增的, 用二进制描述是从最低位加1, 若溢出则向高位进位。

    1
    000 001 010 011 100 101 110 111
  • 而dictScan的游标递增方式比较特别, 用二进制描述是从最高位加1, 若溢出则向低位进位。

    1
    000 100 010 110 001 101 011 111
  • dictScan采用这样特殊的游标递增方式是为了避免在扩容重散列时导致数据读取重复问题和缩容重散列时导致数据读取遗漏。

  • dictScan也不是完美的,其在扩容重散列时没有问题,但在缩容重散列时有可能会导致读取到少量重复数据。

扩容和缩容前后游标对应关系图

  • 上图是扩容,通俗点理解原来一个变成了两个,由于原来的到新的没有重合的,所以没有重复读取的情况
  • 下图是缩容,通俗点理解原来两个变成了一个,由于原来到新的是合二为一有重合,所以有可能会出现重复读取的情况,但这也是为了不遗漏数据所必要的,
    没有重复的情况是当下一个应读取下一组时就不会读取到重复数据。 另外,重复bucket的数量=(bigger_table_size / smaller_table_size) - 1

编程技巧

发表于 2017-06-05

快速求余

1
a % x = a & (x - 1 ) 当x=2^n

redis源码阅读之双端双向链表adlist

发表于 2017-06-05

双端双向链表

  • 双链表优点是便于逆向查找
  • 双端优点是便于插入尾部

adlist结构图

adlist结构体

1
2
3
4
5
6
7
8
9
10
11
12
13
14
15
16
17
18
19
typedef struct listNode {
struct listNode *prev;
struct listNode *next;
void *value;
} listNode;
typedef struct listIter {
listNode *next;
int direction;
} listIter;
typedef struct list {
listNode *head;
listNode *tail;
void *(*dup)(void *ptr);
void (*free)(void *ptr);
int (*match)(void *ptr, void *key);
unsigned long len;
} list;

redis源码阅读之动态字符串sds

发表于 2017-05-31

sds优点

  • 计算字符串长度时间复杂度由O(n)降低到O(1)
  • 额外分配内存减少频繁的内存分配复制开销

sds内存分布

图示为SDS_TYPE_5以上类型

ngx_lua灵活定制fastcgi_cache缓存key

发表于 2017-05-16

Web开发常见的几种缓存

  • 常用缓存(memcached和redis)
  • Nginx的缓存(标准模块缓存: proxy_cache和fastcgi_cache / 第三方模块做缓存: ngx_lua)
  • CDN缓存
  • 浏览器缓存(Cache-Control和LocalStorage)

proxy_cache和fastcgi_cache

proxy_cache和fastcgi_cache都为Nginx的内置缓存,proxy_cache主要用于反向代理时,对后端内容源服务器进行缓存,fastcgi_cache主要用于对FastCGI的动态程序进行缓存。
两者相关配置类似,以下为fastcgi_cache举例

原理

针对fastcgi(如:php-fpm)返回的内容缓存为静态文件(文件名是用Md5算法对Key进行哈希后所得,而Key可使用fastcgi_cache的相关指令来进行控制)
,在用户浏览时,无需重复请求后端fastcgi,而直接返回缓存的内容,减少了后端的语言解析以及数据库连接的消耗。

数据流程图

指令注释

nginx的http作用域:

fastcgi_cache_path /home/wwwroot/yii.me/runtime/logs levels=1:2 keys_zone=keys_zone=zone:512m:1m inactive=1d
max_size=1g; #指定一个路径,目录结构等级,关键字区域存储时间和非活动删除时间。以及最大占用空间(keys_zone主要缓存key和文件元信息,不会缓存页面)

nginx的location作用域:

fastcgi_cache zone; #表示开启FastCGI缓存并为其指定一个名称:zone
fastcgi_cache_valid 1m; #设置缓存时间1分钟
fastcgi_cache_min_uses 1; #设置链接请求1次就被缓存
fastcgi_cache_use_stale error timeout invalid_header http_500; #定义哪些情况下用过期缓存(如果对实效要求不高建议加updating,关闭fastcgi_cache_lock,可提高性能)
fastcgi_cache_methods GET POST; #缓存GET和POST请求
fastcgi_cache_key “$cache_path$containerid$containerpage”; #缓存key=页面+containerid+分页页码
fastcgi_ignore_headers Cache-Control Expires Set-Cookie; #包含这些header的响应不缓存
fastcgi_cache_lock on; #同时有请求处理的时候只有一个请求允许访问后端服务器,其余请求等待缓存结果或等待超时再进行响应
fastcgi_cache_lock_timeout 5s; #等待超时时间5秒,超时则穿透,且不缓存穿透结果
fastcgi_cache_bypass $skip_cache; #非0不从cache中取
fastcgi_no_cache $skip_cache; #非0不保存到cache

性能提升

以下测试使用的vps机器
ab -c10 -n50000 http://127.0.0.1:8080/echo.php

  • fastcgi_cache off Requests per second: 2441.56 [#/sec] (mean)
  • fastcgi_cache zone Requests per second: 3662.79 [#/sec] (mean)

ngx_lua模块

参考资料

  • OpenResty 最佳实践-子查询
  • OpenResty 最佳实践-缓存

    在ngx_lua模块中使用共享内存

  • 定义一个共享内存对象
    语法:lua_shared_dict
    该命令主要是定义一块名为name的共享内存空间,内存大小为size。通过该命令定义的共享内存对象对于Nginx中所有worker进程都是可见的,当Nginx通过reload命令重启时,共享内存字典项会从新获取它的内容,而当Nginx
    退出时,字典项的值将会丢失。
    例子:
    1
    2
    3
    4
    5
    6
    7
    8
    9
    10
    11
    12
    13
    14
    15
    16
    17
    18
    19
    20
    21
    22
    23
    24
    25
    26
    27
    28
    29
    30
    31
    32
    33
    34
    35
    36
    37
    38
    39
    40
    41
    42
    43
    44
    location /testngxlua {
    default_type application/json;
    charset utf8;
    access_by_lua '
    function get_from_cache(key)
    local cache_ngx = ngx.shared.my_cache
    local value = cache_ngx:get(key)
    return value
    end
    function set_to_cache(key, value, exptime)
    if not exptime then
    exptime = 0
    end
    local cache_ngx = ngx.shared.my_cache
    local succ, err, forcible = cache_ngx:set(key, value, exptime)
    return succ
    end
    ngx.req.read_body()
    local c = ngx.req.get_uri_args()["c"] or ""
    local str = get_from_cache(c)
    if (str ~= nil) then
    ngx.print("ngx_cache: "..str)
    else
    local options = {}
    options["method"] = ngx.var.request_method == "GET" and ngx.HTTP_GET or ngx.HTTP_POST
    options["body"] = ngx.var.request_body
    options["args"] = ngx.var.args
    local res = ngx.location.capture("/index.php"..ngx.var.uri, options)
    if res.status == 200 then
    set_to_cache(c, res.body, 300)
    ngx.print(res.body)
    else
    ngx.say(res.status)
    end
    end
    ';
    }

Wanna cry加密解密流程分析

发表于 2017-05-16

永恒之蓝勒索病毒文件加密解密流程,核心使用RSA+AES

加密流程

  • RSA秘钥A,公钥A.public硬编码在加密程序中,私钥A.private作者自己持有
  • 每个用户随机生成一对RSA秘钥B,公钥B.public用于加密AES的key,私钥B.private被作者的公钥A.public进行RSA加密B.private.encypt
  • 遍历加密后缀列表(没有.torrent)中的文件进行加密,每个文件随机生成一个128位的key,使用B.public对key进行RSA加密得key2
  • 对原始文件F使用key2进行AES加密得F.encrypt
  • 删除原始文件,把key2和F.encrypt写入新文件

解密流程

  • 把B.private.encypt发给作者
  • 作者使用A.private将B.private.encypt进行RSA解密还原成B.private
  • 从被加密的文件中提取key2,使用B.private对key进行RSA解密还原成key
  • 使用key对F.encrypt进行AES解密得F(原始文件)

以上可知,只要作者的RSA私钥A.private不泄露,那些被加密的文件理论无法破解
而作者提出使用比特币作为支付方式,是利用比特币的匿名性和无法被冻结,但比特币的交易记录是公开的,作者没有办法把每笔交易和某个感染用户关联,所以即使支付赎金,也可能无法解密文件

linux有用的命令

发表于 2017-05-12

lsattr和chattr

这两个命令是用来查看和改变文件、目录属性的,与chmod这个命令相比,chmod只是改变文件的读写、执行权限,更底层的属性控制是由chattr来改变的

查看文件属性

1
lsattr /etc/sudoers

设置文件只读属性

1
2
chattr -i /etc/sudoers
chattr +i /etc/sudoers

nc

1
2
3
4
-v 显示指令执行过程。
-w <超时秒数> 设置等待连线的时间。
-u 表示使用UDP协议
-z 使用0输入/输出模式 (用来告诉 nc 报告开放的端口,而不是启动连接)

端口扫描

1
2
nc -v -w 10 -z 192.168.0.100 8080
nc -w 2 -z 192.168.0.100 1-65535

传输文件

  • 监听

    1
    nc -v -l -p 4444 > demo.txt
  • 连接

    1
    nc -v 192.168.0.100 4444 < demo.txt

find

查找目录下的所有文件中是否含有某个字符串

1
find .|xargs grep -ri "IBM"

查找目录下的所有文件中是否含有某个字符串,并且只打印出文件名

1
find .|xargs grep -ri "IBM" -l

查找文件

1
2
3
4
find . -name "*.txt" ;按照文件名
find . -empty ;查找空文件
find . -user himanshu -name "*.txt" ;指定用户
find . -szie -1024c + 256c ;指定文件大小范围>256字节<1024字节

ll

文件排序

1
ll -S

统计文件个数

1
ll | grep "^-" | wc -l

notify-send

  • 每周4下午3点显示一个提醒弹窗

    1
    00 15 * * 4 export DISPLAY=:0.0 && sudo -u zongwen1 /usr/bin/notify-send "[自定义提醒]" "该写周报了!"
  • mac版弹窗命令

    1
    osascript -e 'display notification "该写周报了!" with title "[自定义提醒]"'

zssh

  • zssh 配合 sz和rz 可以方便地通过shell传输文件

alias

设置命令别名,可缩短命令长度
例如

1
2
3
4
sudo vim /home/当前用户/.bashrc ;对当前用户有效
sudo vim /etc/profile ;全局用户有效
source /etc/profile
alias sqlmap=’python /path/sqlmap.py’

sqlmap

  • 需要python环境,下载后即可使用了
1
2
3
git clone https://github.com/sqlmapproject/sqlmap.git
cd sqlmap
python sqlmap.py -u "http://192.168.0.1/?id=1" ;建议使用alias设置别名
12
sohow

sohow

19 日志
19 标签
青鱼博客
© 2018 sohow
由 Hexo 强力驱动
主题 - NexT.Muse